跳到主要内容

博客

代码人生:编织技术与生活的博客之旅

RQPro2.0 与 VS code 的集成

安装 Python Extensions
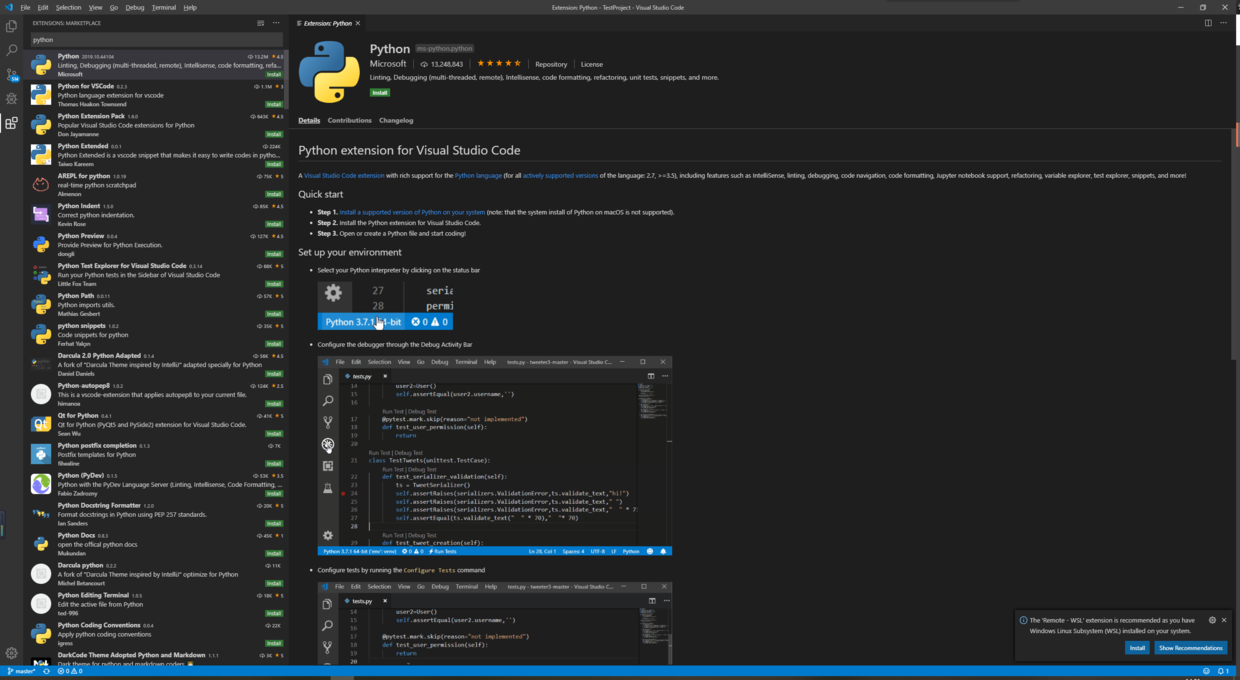
image.png

  • 点击 install安装
  • 安装后重启 VS code

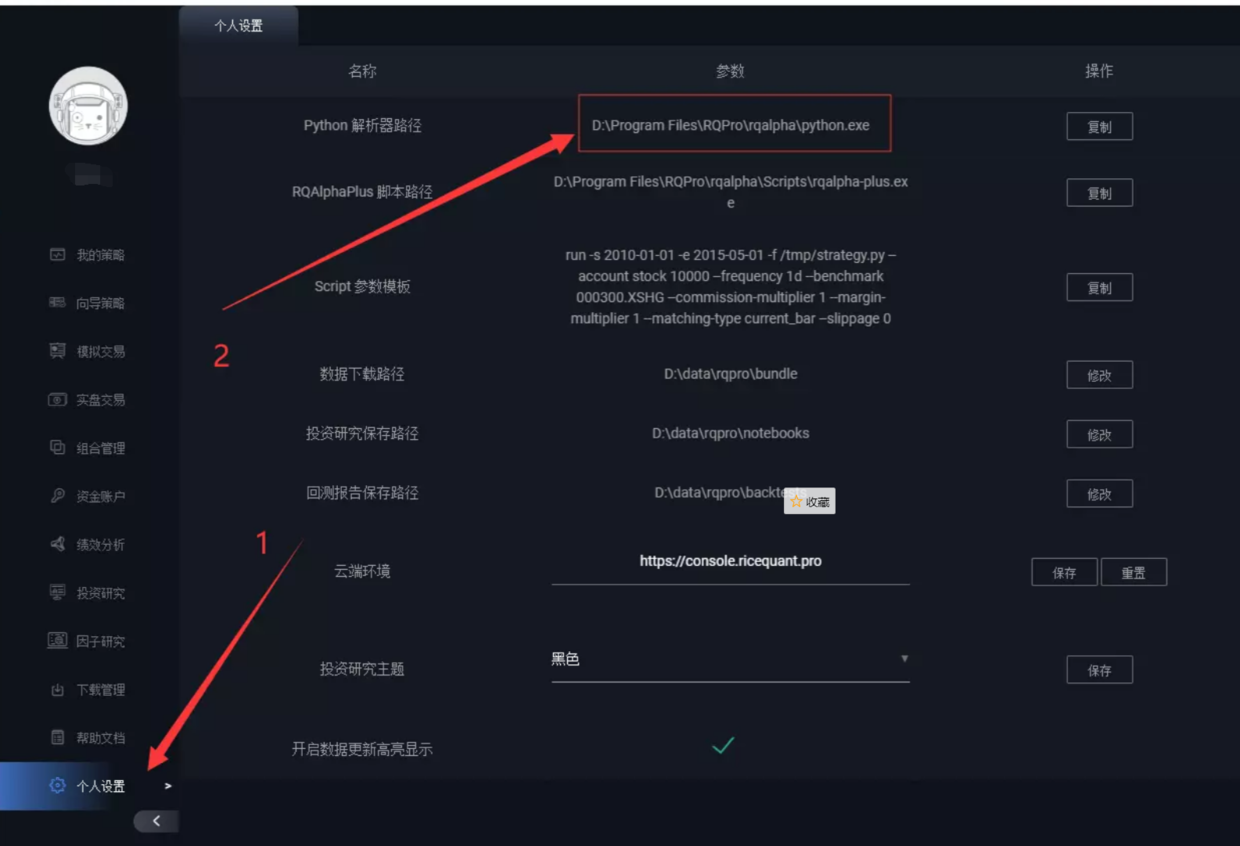
获取 rqpro python 环境路径

image.png

本机的 rqalpha python 环境路径为 D:\Program Files\RQPro\rqalpha\python.exe

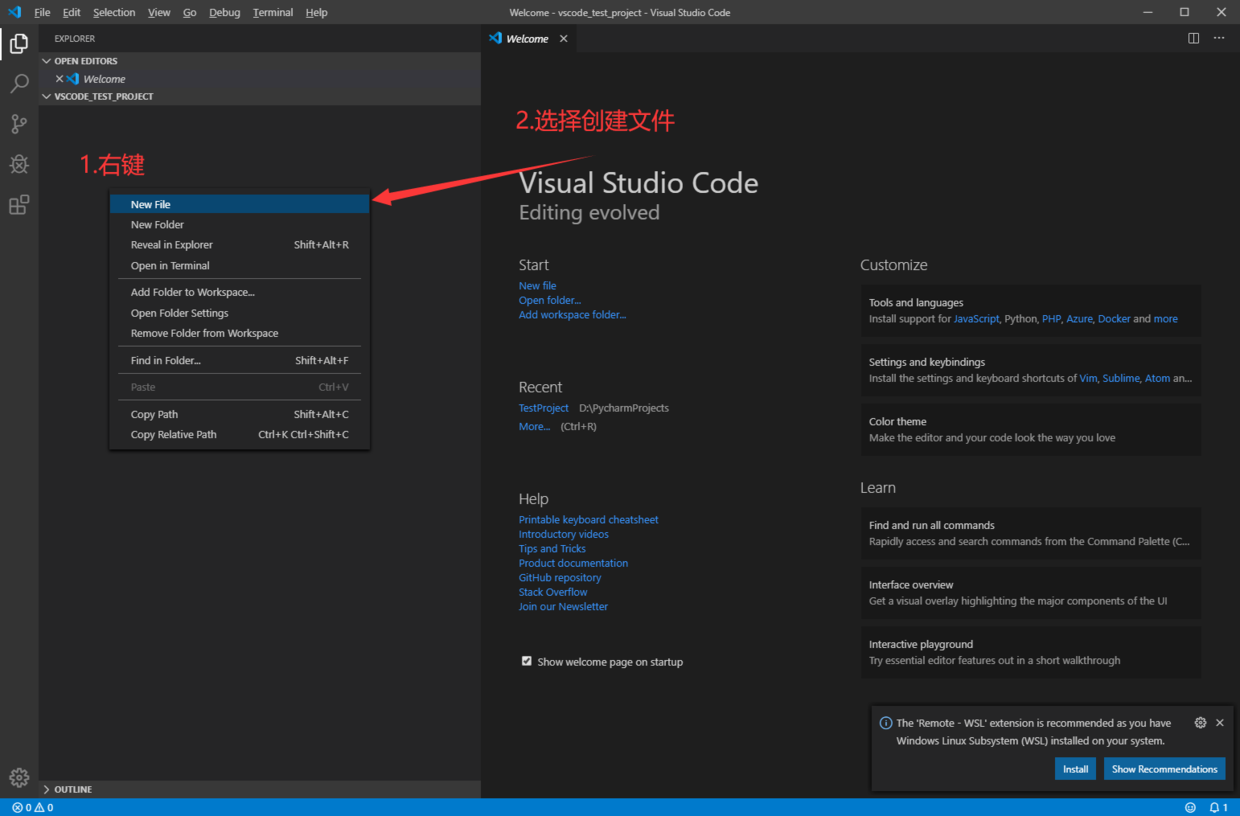
新建项目

  1. 新建一个文件夹
  2. 将文件夹拖入到 VS code 窗口
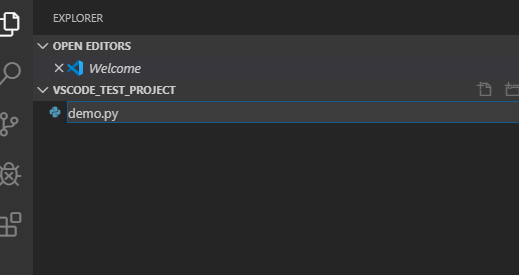
  3. 创建一个。py 文件

image.png

image.png

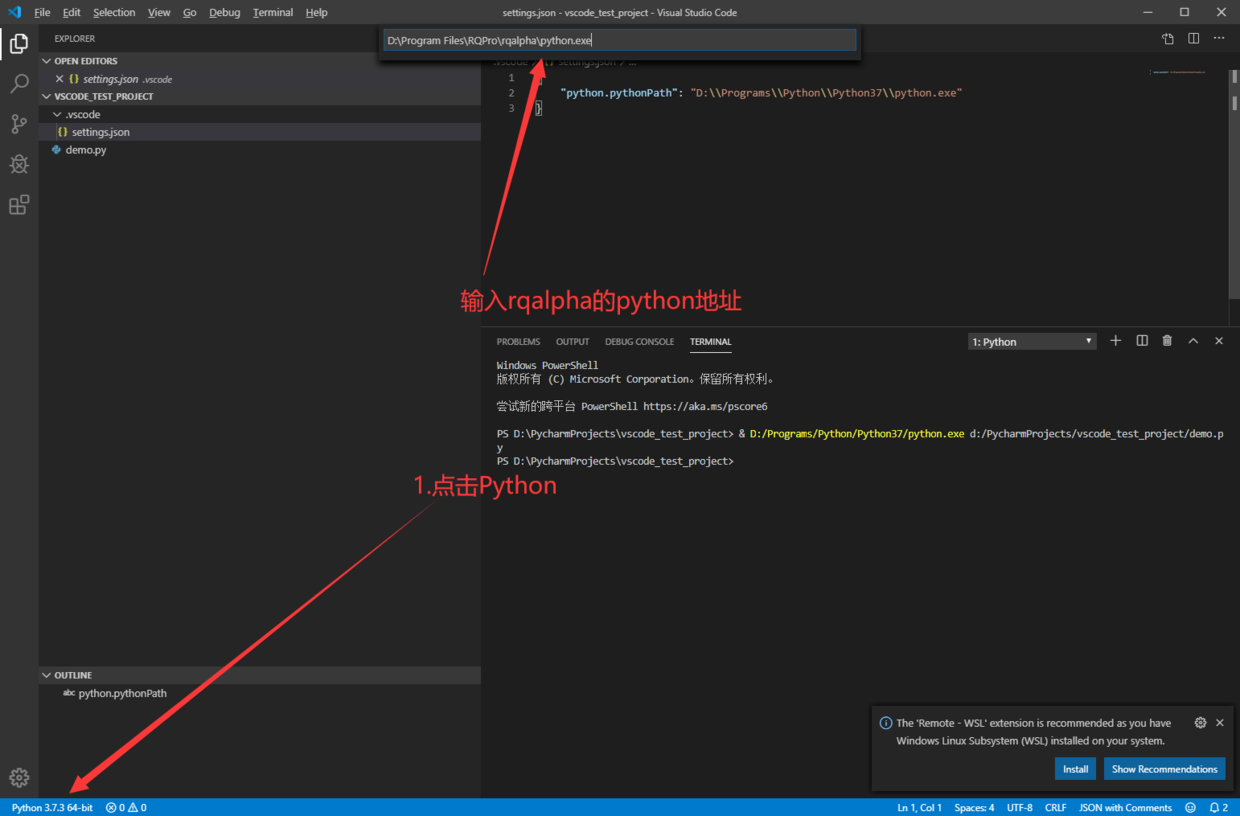
配置 python 环境

image.png

如果不能选择此 python

需要做如下修改

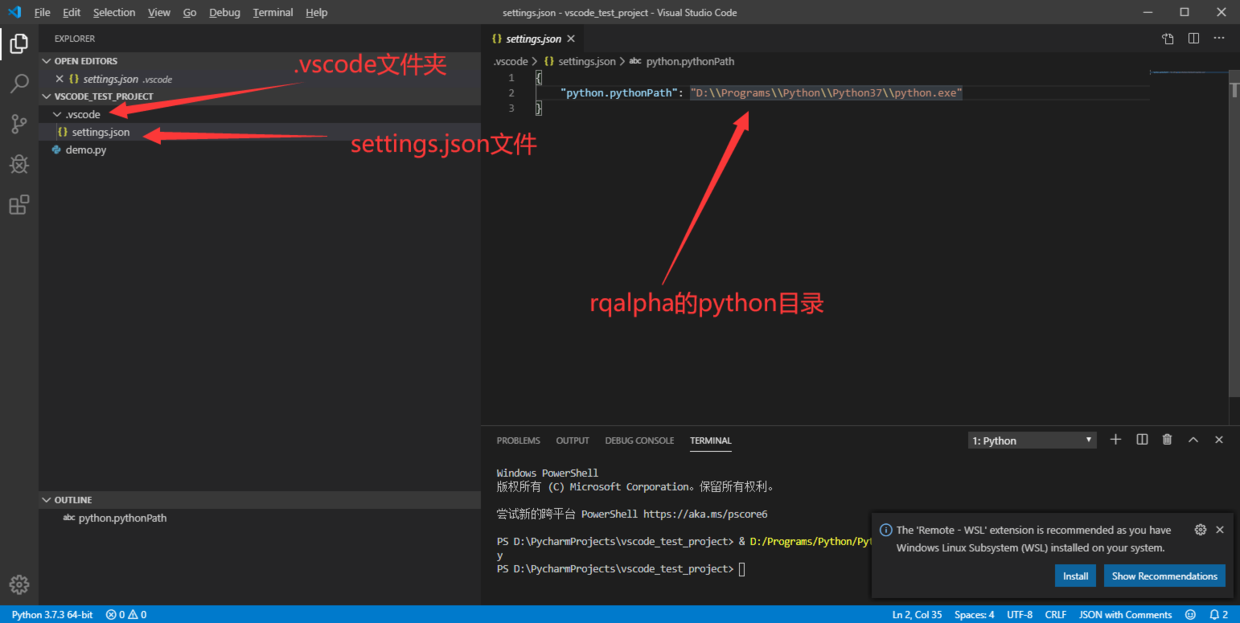
  1. 选择项目文件夹下 .vscode 文件夹下 settings.json 文件 (没有文件或文件夹则创建)
  2. 将"python.pythonPath"的值改为 python.exe 路径(注意双反斜杠转义) image.png
使用 rqdatac 与 rqfactor

输入下列代码

#!/usr/bin/python3    
# encoding: utf-8
import pandas as pd
import rqdatac
import rqfactor
from rqfactor.execute.engine_data_source import FactorEngineDataSource
from rqfactor.engine import FactorExecutionEngine

rqdatac.init() # 需要账号密码 请参照 rqdata 文档
data_source_path = r'D:\data\rqpro\bundle' # RQPro2.0 - 个人设置 - 数据下载路径

_engine_data_source = FactorEngineDataSource(data_source_path)
engine = FactorExecutionEngine(_engine_data_source)
factor = rqfactor.Factor('close')
order_book_ids = rqdatac.index_components('000300.XSHG')
end_date = pd.Timestamp('20190910')
result = engine.get_multiple(factor, order_book_ids, end_date, 1)
print(result.all())

点击右上角绿色三角形运行 python 代码
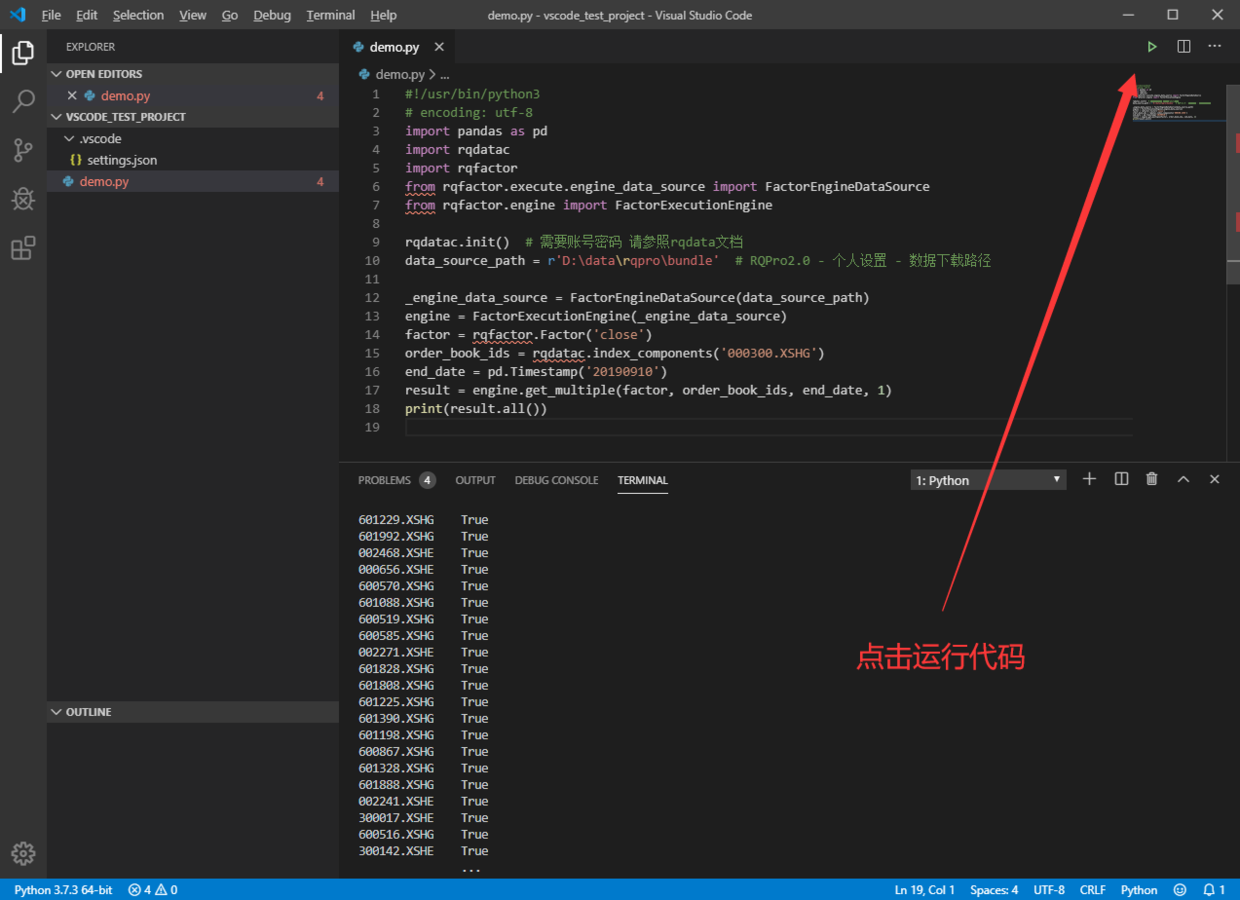
image.png

运行 RQAalpha 回测

.vscode文件夹下 launch.json中输入如下代码:

{    
// Use IntelliSense to learn about possible attributes.
// Hover to view descriptions of existing attributes.
// For more information, visit: https://go.microsoft.com/fwlink/?linkid=830387
"version": "0.2.0",
"configurations": [
{
"name": "rqalpha_plus",
"type": "python",
"request": "launch",
"module": "rqalpha_plus",
"args": [
"run", "-s", "2015-03-01", "-e", "2015-05-01",
"-f", "${file}",
"--account", "stock", "10000", "--frequency", "1d", "--benchmark", "000300.XSHG",
"--commission-multiplier", "1", "--margin-multiplier", "1", "--matching-type", "current_bar", "--slippage", "0"
],
"env": {"PYTHONIOENCODING": "utf-8"}
}
]
}
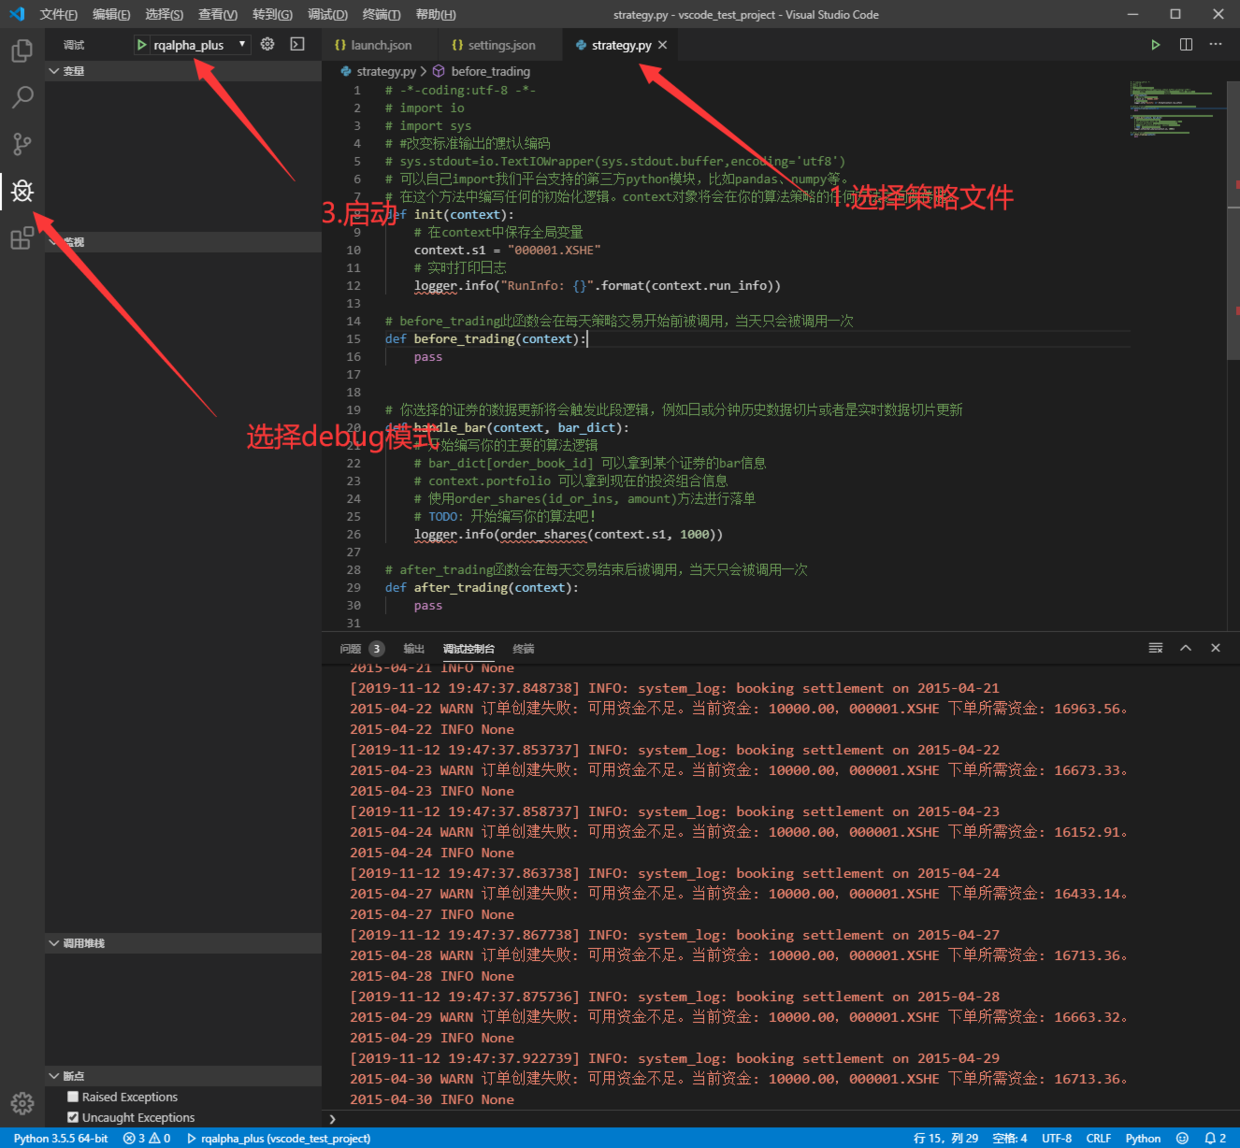
  • 选择策略文件 使用 debug 模式运行

image.png

随笔阅读需 2 分钟

  • 线上自动编译时出现错误 SyntaxError: invalid syntax
  • 谷歌上搜 nonlocal open_cite_tag 没有任何相关信息
Running Sphinx v1.7.9    
loading translations [zh_CN]... done

Traceback (most recent call last):
File "/home/docs/checkouts/readthedocs.org/user_builds/rqalpha/envs/develop/local/lib/python2.7/site-packages/sphinx/cmdline.py", line 303, in main
args.warningiserror, args.tags, args.verbosity, args.jobs)
File "/home/docs/checkouts/readthedocs.org/user_builds/rqalpha/envs/develop/local/lib/python2.7/site-packages/sphinx/application.py", line 191, in __init__
self.setup_extension(extension)
File "/home/docs/checkouts/readthedocs.org/user_builds/rqalpha/envs/develop/local/lib/python2.7/site-packages/sphinx/application.py", line 411, in setup_extension
self.registry.load_extension(self, extname)
File "/home/docs/checkouts/readthedocs.org/user_builds/rqalpha/envs/develop/local/lib/python2.7/site-packages/sphinx/registry.py", line 315, in load_extension
mod = __import__(extname, None, None, ['setup'])
File "/home/docs/checkouts/readthedocs.org/user_builds/rqalpha/envs/develop/local/lib/python2.7/site-packages/nbsphinx.py", line 1088
nonlocal open_cite_tag
^
SyntaxError: invalid syntax

Exception occurred:
File "/home/docs/checkouts/readthedocs.org/user_builds/rqalpha/envs/develop/local/lib/python2.7/site-packages/sphinx/registry.py", line 315, in load_extension
mod = __import__(extname, None, None, ['setup'])
File "/home/docs/checkouts/readthedocs.org/user_builds/rqalpha/envs/develop/local/lib/python2.7/site-packages/nbsphinx.py", line 1088
nonlocal open_cite_tag
^
SyntaxError: invalid syntax
The full traceback has been saved in /tmp/sphinx-err-cnpEVe.log, if you want to report the issue to the developers.
Please also report this if it was a user error, so that a better error message can be provided next time.
A bug report can be filed in the tracker at https://github.com/sphinx-doc/sphinx/issues. Thanks!

对照后发现 nbsphinx ==0.3.5 时会成功 requirements.txt 文件加上版本限制就 ok

  • cat requirements.txt
Sphinx    
watchdog
sphinx_rtd_theme
nbsphinx ==0.3.5
jupyter_client

image.png

编程阅读需 1 分钟

https://blog.csdn.net/the_victory/article/details/52781357

  1. 首先打开你的 starUML 安装目录,并找到 LicenseManagerDomain.js,starUML 是用 NodeJS 写的,这个文件就是判断注册用户的文件,我的目录是:D:\Program Files (x86)\StarUML\www\license\node\LicenseManagerDomain.js
  2. 修改该文件,找到第 24 行,加入如下所示区域的代码。
    function validate(PK, name, product, licenseKey) {    
var pk, decrypted;

//edit by ChrisChang, 加入如下几行
return {
name: "Chang",//随意
product: "StarUML",
licenseType: "vip",
quantity: "blog.csdn.net/the_victory",//随意
licenseKey: "later equals never!"
};
//-------------END

try {
pk = new NodeRSA(PK);
decrypted = pk.decrypt(licenseKey, 'utf8');
} catch (err) {
return false;
}
var terms = decrypted.trim().split("\n");
if (terms[0] === name && terms[1] === product) {
return {
name: name,
product: product,
licenseType: terms[2],
quantity: terms[3],
licenseKey: licenseKey
};
} else {
return false;
}
}

  1. 重启 starUML 需要在 help->Enter License 选项里面输入你代码里写的 name 和 licensekey。
  2. 重启 starUML,你会发现已经没有提示了,然后点击 help->about starUML, 结果如下

编程阅读需 1 分钟

  • oculus quest2 本文中简称 OC2


问题由来

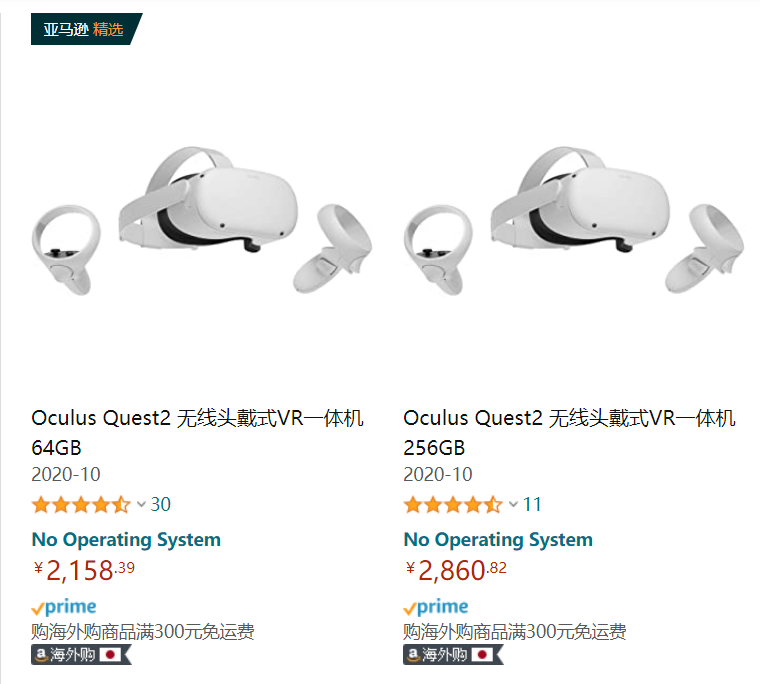
最近发行的 oculus quest2 的价格已经到 2k+了,广告铺天盖地的。

对于这件事情,让我想起了小米发布第一部手机时,1999 价格出来的那一刻。

此时,同等价位其他手机卖不出去,大家都得把手机价格打下来手机行业开始内卷


OC2 出现了 199 美元,这个和小米 1999RMB 的小米 1 一样的感觉,感觉 VR 硬件也发展成熟,要打价格战的时候了。知乎上说 OC2 对标的是 NS。确实 2k 多 买个 NS 游戏还得花很多钱,OC2 无限连接电脑玩 Steam 上的游戏要爽得多。

OC2 目前我觉得的优点:

  • 2 基于四个摄像头定位,不再需要定位传感器。
  • 支持无线串流 无需线材就能上 Steam 玩游戏(得要好 wifi)。
  • 自带游戏平台,没得显卡一样能玩。

所以,当前的 VR,2k 就得到一个很好的体验了,也不需要太多场地,当然,得会用梯子

设备价格下来了,那么应用市场则会更大,玩家有更多购买游戏(玩盗版)的机会。

VR 目前还没出现内卷,先到先占位,OC2 作为第一个开始,打破市场的商家,马上硬件会产生内卷现象,然后 VR 软件业蓬勃发展。目前我觉得是个风口。


HOW TO DO

风口来了,当然想进去赚钱,要么打工,要么提供打工。

打工

  • 首先,本人只想做 python 相关的后端。
  • 其次,还想 [逃离 996 环境] - [[远程工作分析]]。

在深圳找了找,VR 游戏公司只有三四家,且基本上不要 python。(还在继续找。..)


Another choice

机缘巧合下,和一个游戏运营大佬聊了聊。大佬目前在开 VR 体验店(据说是在赔钱)。

以下是大佬的观点:

在深圳,所有的互联网企业离不开腾讯阿里,基本上背后都腾讯和阿里的投资。那么做 IT 的,最终目标有两个,要么进入阿里腾讯,要么公司被阿里腾讯收购,似乎没有别的路走(有的话请留言)。

考虑自己做工作室 or 进腾讯阿里,之前的工作室散伙,优秀的去了腾讯,不优秀的留在了市场。

觉得自己能行,从腾讯出来创业的,最后还是要么被腾讯投资控股,要么被腾讯投资控股的公司打败。大部分从腾讯出来的混的好像不咋样。

如果自己有闲钱,可以考虑找几个伙伴合伙做游戏。

先了解下这几个游戏:

  • vr 和键鼠同时支持的游戏 payday2
  • 三消做得非常棒的游戏 mirro (自带官网 18h 补丁)

用 Unity 或者 RPG maker 做一点自己的成品。(虚幻 4 要收费)


目前想法

  • 考虑深圳的 vr 公司
  • 独立游戏工作室
  • 做成一个游戏后,上 steam 平台。证明自己 。(考虑反着抄 把同样的模式抄到不同领域)

ps, 网上有说 python 能开发 unity 3d 的程序,我只找到了 python2 的开发方式。参考。

ps. 公司选择范围小的话,可以选择精投。 大概推荐以下做法

  • 带自荐信。
  • 了解这个公司内部架构和人员信息。
  • 按对方需求写简历。
  • 找到内部人员内推。

随笔阅读需 3 分钟

参考


  • 公司要求连接服务器必须使用跳转机

  • finalshell的自带文件(类似winScp)传输用不了了

  • 因为用的cmd一直是cmder 界面挺好看的 不想换

  • 再加上电脑装了Ubuntu子系统

  • 有了以下解决方案

    1. 首先找个教程下个cmder,给windows 10的机器装上Ubuntu子系统。
    1. 在Ubuntu子系统上安装 zssh
    1. 和使用ssh完全一样,只是打命令时,变成了zssh
#zssh [root@192.168.1.1](mailto:root@192.168.1.1)    
    1. 上传文件
好了,在进入后,你需要上传文件的话。先 ctrl+@    
zssh > //这里切换到了本地机器
zssh>pwd //看一下本地机器的目录在那
zssh>ls  //看一下有那些文件
zssh>sz 123.txt //上传本地机器的当前目录的123.txt到远程机器的当前目录
    1. 下载文件
root@192.168.1.1 > sz filename  //在远程机器上,启动sz, 准备发送    
// 看到一堆乱码 然后再 #ctrl+@
zssh > pwd //看看在那个目录,cd 切换到合适的目录
zssh > rz //接住对应的文件

11

随笔阅读需 1 分钟

什么是 conda

conda 是一个包、依赖、环境管理工具。方便 python 间环境隔离。 conda 可以创建许多单独的 python 环境,这些 python 环境相互隔离,当其中一个 python 环境因为改动或其他原因错误时,不会影响其他 python 环境。

为什么装 miniconda

参考 miniconda 清华源

下载 miniconda

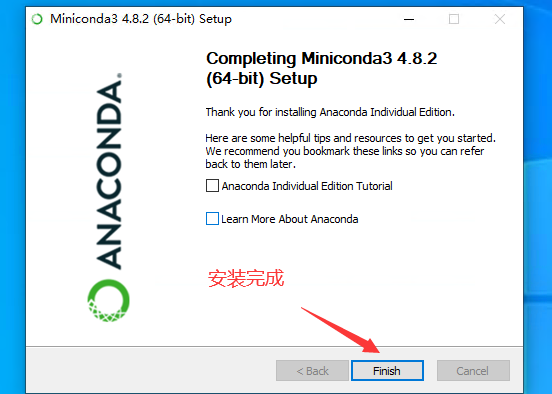
清华源 下载一个 miniconda 并安装

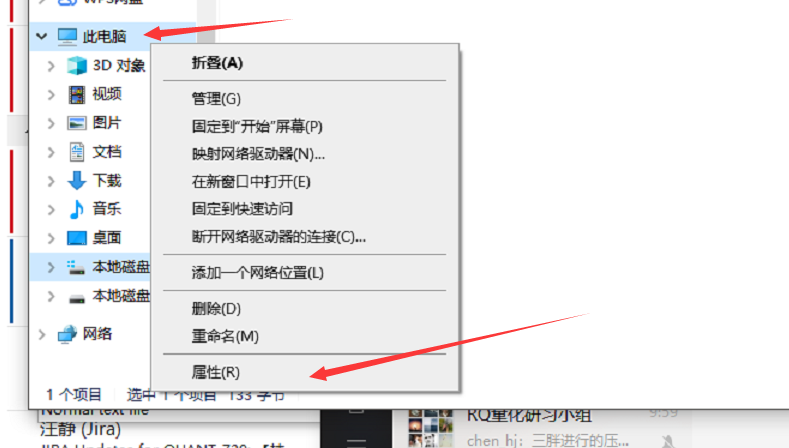
下载后 如下几个需要手动改一下

  • 对于部分没有点添加到环境变量的小伙伴 请按如下操作添加环境变量

例如默认路径为:”C:\Users\Administrator\Miniconda3”, 那么需要添加的三个路径则是:     
1)C:\Users\Administrator\Miniconda3;
2)C:\Users\Administrator\Miniconda3\Scripts;
3)C:\Users\Administrator\Miniconda3\Library\bin
第一个路径是 Miniconda 的根目录,也是最重要的路径!

* 如果你的环境变量中已经存在这三个路径,那么就不用添加了。

运行 miniconda

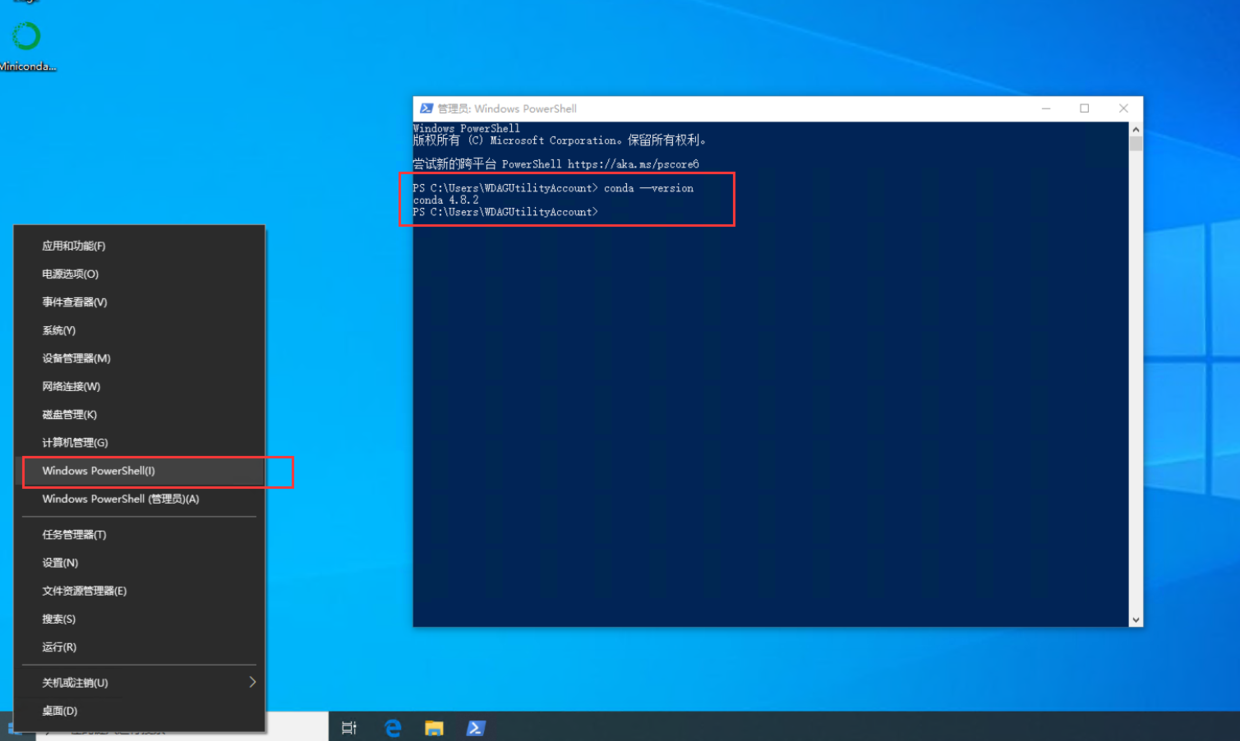
右键开始菜单,打开Windows PowerShell (可选: 输入 conda activate base 启动 base 环境)

此时就已经有 python 了

可以输入 conda --version 看一看版本


pip 配置默认镜像源

pip 默认下载源在国外,改为国内后,安装各种依赖会快很多。

  • 在 cmd 命令行下 运行如下命令
pip config set global.index-url http://pypi.douban.com/simple    
pip config set global.trusted-host pypi.douban.com
pip config set global.index-url https://pypi.tuna.tsinghua.edu.cn/simple    
pip config set global.trusted-host pypi.tuna.tsinghua.edu.cn

下载使用 rqdatac

  • 创建 python 3.8 虚拟环境 conda create -n py38 python=3.8.2

  • 激活环境 conda activate py38

  • 安装 rqdatac pip install rqdatac 如果安装了 zsh 请执行命令rehash

  • 安装 ipython (ipython 补全功能非常亲民) pip install ipython

使用 rqdatac

  • 输入ipython 然后按如下操作
import rqdatac    
rqdatac.init("手机号","密码")
rqdatac.user.get_quota()
#{'bytes_used': 742981, #已使用流量
# 'bytes_limit': 52428800.0, # 总流量
# 'remaining_days': 760, # 剩余使用天数
# }
rqdatac.all_instruments()
# order_book_id symbol ... listed_date de_listed_date
#0 M1901P3650 豆粕 1901 沽 3650 ... 2018-04-10 2018-12-07
#1 SR1901C4900 白糖 1901 购 4900 ... 2018-04-17 2018-11-26
#2 SR1907C5400 白糖 1907 购 5400 ... 2018-01-17 2019-05-27
#3 M1907P2900 豆粕 1907 沽 2900 ... 2018-07-17 2019-06-10

rqdatac.instruments("000001.XSHE")
# Instrument(order_book_id='000001.XSHE', industry_code='J66', market_tplus=1, symbol='平安银行', special_type='Normal', exchange='XSHE', status='Active', type='CS', de_listed_date='0000-00-00', listed_date='1991-04-03', sector_code_name='金融', abbrev_symbol='PAYH', sector_code='Financials', round_lot=100, trading_hours='09:31-11:30,13:01-15:00', board_type='MainBoard', industry_name='货币金融服务', citics_industry_code='40', citics_industry_name='银行')

rqdatac.get_price("000001.XSHE")
# num_trades limit_down volume ... high open low
#date ...
#2020-01-10 37440.0 15.11 58554845.0 ... 16.81 16.79 16.52
#2020-01-13 42233.0 15.02 87213336.0 ... 17.03 16.75 16.61
#2020-01-14 60290.0 15.29 130449366.0 ... 17.27 16.99 16.76
#2020-01-15 60129.0 15.08 85943912.0 ... 16.86 16.79 16.4

conda 基本操作

  • 查看版本信息 conda --version
  • 更新 conda conda update conda
  • 创建一个虚拟环境 conda create -n py38 python=3.8.2
  • 激活新的虚拟环境 conda activate py38
  • 列出环境信息 conda env list
  • 退出当前环境 conda deactivate
  • 删除虚拟环境conda remove --name py38 --all
随笔阅读需 3 分钟

相关参考 python 中文写入 CSV 乱码解决

  • 原因:csv 文件开头缺少 BOM_UTF8 字符
  • 解决:在 Response 开头加上 BOM_UTF8 字符
  • 核心代码
titles[0] = codecs.BOM_UTF8.decode("utf8")+codecs.BOM_UTF8.decode()+titles[0]    
  • 相关引入
import codecs    
import csv

from flask_admin._compat import csv_encode
from flask import request, redirect, flash, current_app, Response, stream_with_context
  • 逻辑代码(复制 放到对应的 ModelView 类里就好了)
    def _export_csv(self, return_url):    
"""
Export a CSV of records as a stream.
"""
count, data = self._export_data()

# https://docs.djangoproject.com/en/1.8/howto/outputting-csv/
class Echo(object):
"""
An object that implements just the write method of the file-like
interface.
"""
def write(self, value):
"""
Write the value by returning it, instead of storing
in a buffer.
"""
return value

#
writer = csv.writer(Echo())

def generate():
# Append the column titles at the beginning
titles = [csv_encode(c[1]) for c in self._export_columns]
titles[0] = codecs.BOM_UTF8.decode("utf8")+codecs.BOM_UTF8.decode()+titles[0]
yield writer.writerow(titles)

for row in data:
vals = [csv_encode(self.get_export_value(row, c[0]))
for c in self._export_columns]
yield writer.writerow(vals)

filename = self.get_export_name(export_type='csv')

disposition = 'attachment;filename=%s' % (secure_filename(filename),)

return Response(
stream_with_context(generate()),
headers={'Content-Disposition': disposition},
mimetype='text/csv'
)
Python阅读需 1 分钟

  • 人比较懒 ,看不懂评论告诉我哈

vim view_markdown_index.py

#!/usr/bin/python3    
# encoding: utf-8
# @Time : 2020/3/26 15:37
# @author : zza
# @Email : 740713651@qq.com
# @File : readme_helper.py
import datetime
import os
from shutil import copyfile

import markdown
import markdown.extensions.fenced_code
from flask import flash, redirect, request, send_from_directory
from flask_admin import AdminIndexView, expose
from pygments.formatters.html import HtmlFormatter
from werkzeug.utils import secure_filename

formatter = HtmlFormatter(style="emacs", full=True, cssclass="codehilite")
css_string = formatter.get_style_defs()

class MarkdownIndexView(AdminIndexView):

@expose()
def index(self):
"""获取 readme 文件作为 index 页面帮助文档
copy from https://github.com/solitudenote/gitkeeper/blob/d42f5990b05cf28cee12f20780e7794cd3579ead/app.py
"""
# get file
readme_file = open("README.md", "r", encoding="utf8")
md_template_string = markdown.markdown(readme_file.read(), extensions=["fenced_code", "codehilite"])
md_css_string = "<style>" + css_string + "</style>"
md_template = md_css_string + md_template_string
return self.render(self._template, readme_md=md_template, upload_readme_url="/admin/upload_form")

@expose('/upload_form', methods=['POST'])
def upload_file(self):
# check if the post request has the file part
if 'file' not in request.files:
flash('No file part')
return redirect('/admin/')
file = request.files['file']
if file.filename == '':
flash('No file selected for uploading')
return redirect('/admin/')
if file and file.filename == "README.md":
bak_file = "README.md" + ".{}.bak".format(datetime.datetime.now().isoformat()).replace(":", "-")
copyfile("README.md", bak_file)
filename = secure_filename(file.filename)
file.save(filename)
flash('README.md 上传成功')
return redirect('/admin/')
else:
flash('文件名必须为 README.md')
return redirect('/admin/')

@expose('/export')
def export(self):
return send_from_directory(os.path.abspath("."), "README.md", as_attachment=True) # as_a

admin_index_view = MarkdownIndexView(name="主页", template="index.html")

vim index.html

{% extends 'admin/index.html' %}    

{% block page_body %}
{{ super() }}

<table class="markdown-table table-hover searchable">
<tr>
<td>
<a href="{{ get_url('.export') }}"
title="{{ _gettext('Export') }}">{{ _gettext('Export') + ' ' + export_type|upper }}</a>
</td>

<form id="form" method="post" action={{ upload_readme_url }} enctype="multipart/form-data">
<td>
<label class="input-file">
<a title="{{ _gettext('Import') }}"> {{ _gettext('Import') }} </a>
<input type="file" name="file" id="upload-file" autocomplete="off" hidden required>
</label>
</td>
</form>

</tr>
</table>
<br>
<hr/>
<script>

let __main = function () {
document.getElementById("upload-file").onchange = function () {
document.getElementById("form").submit();
};
}

__main()
</script>

{{ readme_md|safe }}

<style>
.markdown-table {
width: 200px;
float: right;

}

.markdown-table label {
font-weight: normal;
}

[hidden] {
display: none !important;
}

</style>
{% endblock %}

vim app,py

from view_markdown_index import admin_index_view    
from flask import Flask

app = Flask(__name__)
admin_view = Admin(
app,
template_mode='bootstrap3',
index_view=admin_index_view,
base_template=r'layout.html',
category_icon_classes={'Profiles': 'glyphicon glyphicon-wrench'},
)

if __name__ == '__main__':
app.run()

Python阅读需 2 分钟

{% extends 'admin/base.html' %}    

{% block head_tail %}
{{ super() }}
<link href="{{ url_for('static', filename='layout.css') }}" rel="stylesheet">
<style>
.container {
width: 100%;
}
</style>
{% endblock %}
Python阅读需 1 分钟