跳到主要内容

博客

代码人生:编织技术与生活的博客之旅

参考


  • 公司要求连接服务器必须使用跳转机

  • finalshell的自带文件(类似winScp)传输用不了了

  • 因为用的cmd一直是cmder 界面挺好看的 不想换

  • 再加上电脑装了Ubuntu子系统

  • 有了以下解决方案

    1. 首先找个教程下个cmder,给windows 10的机器装上Ubuntu子系统。
    1. 在Ubuntu子系统上安装 zssh
    1. 和使用ssh完全一样,只是打命令时,变成了zssh
#zssh [root@192.168.1.1](mailto:root@192.168.1.1)    
    1. 上传文件
好了,在进入后,你需要上传文件的话。先 ctrl+@    
zssh > //这里切换到了本地机器
zssh>pwd //看一下本地机器的目录在那
zssh>ls  //看一下有那些文件
zssh>sz 123.txt //上传本地机器的当前目录的123.txt到远程机器的当前目录
    1. 下载文件
root@192.168.1.1 > sz filename  //在远程机器上,启动sz, 准备发送    
// 看到一堆乱码 然后再 #ctrl+@
zssh > pwd //看看在那个目录,cd 切换到合适的目录
zssh > rz //接住对应的文件

11

随笔阅读需 1 分钟

什么是 conda

conda 是一个包、依赖、环境管理工具。方便 python 间环境隔离。 conda 可以创建许多单独的 python 环境,这些 python 环境相互隔离,当其中一个 python 环境因为改动或其他原因错误时,不会影响其他 python 环境。

为什么装 miniconda

参考 miniconda 清华源

下载 miniconda

清华源 下载一个 miniconda 并安装

下载后 如下几个需要手动改一下

  • 对于部分没有点添加到环境变量的小伙伴 请按如下操作添加环境变量

例如默认路径为:”C:\Users\Administrator\Miniconda3”, 那么需要添加的三个路径则是:     
1)C:\Users\Administrator\Miniconda3;
2)C:\Users\Administrator\Miniconda3\Scripts;
3)C:\Users\Administrator\Miniconda3\Library\bin
第一个路径是 Miniconda 的根目录,也是最重要的路径!

* 如果你的环境变量中已经存在这三个路径,那么就不用添加了。

运行 miniconda

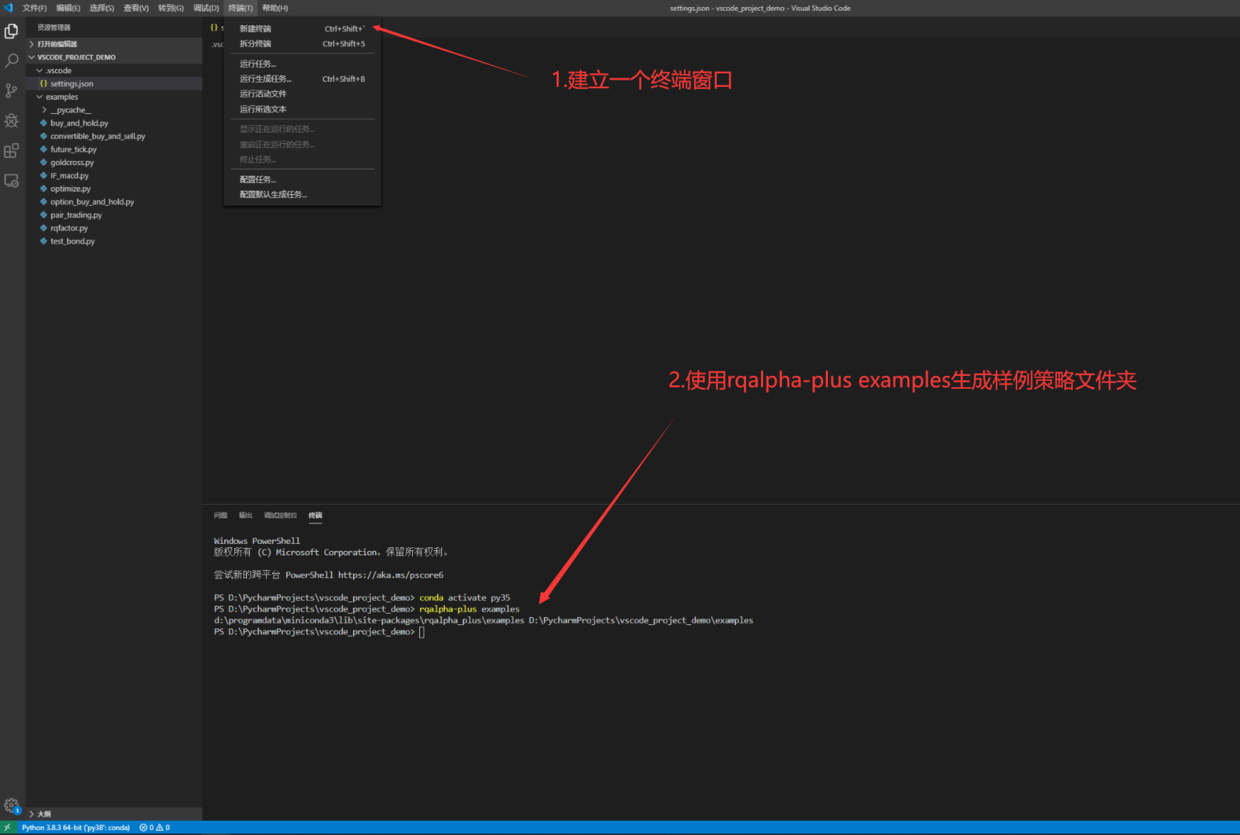
右键开始菜单,打开Windows PowerShell (可选: 输入 conda activate base 启动 base 环境)

此时就已经有 python 了

可以输入 conda --version 看一看版本


pip 配置默认镜像源

pip 默认下载源在国外,改为国内后,安装各种依赖会快很多。

  • 在 cmd 命令行下 运行如下命令
pip config set global.index-url http://pypi.douban.com/simple    
pip config set global.trusted-host pypi.douban.com
pip config set global.index-url https://pypi.tuna.tsinghua.edu.cn/simple    
pip config set global.trusted-host pypi.tuna.tsinghua.edu.cn

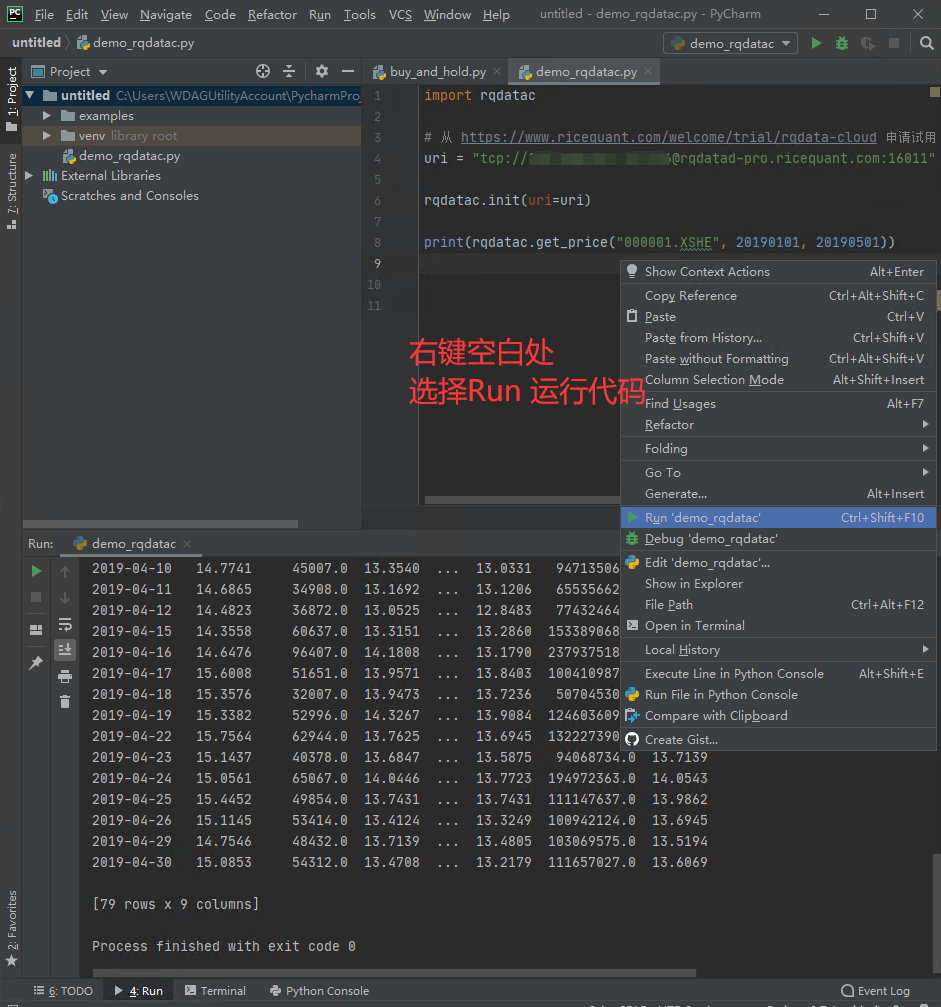
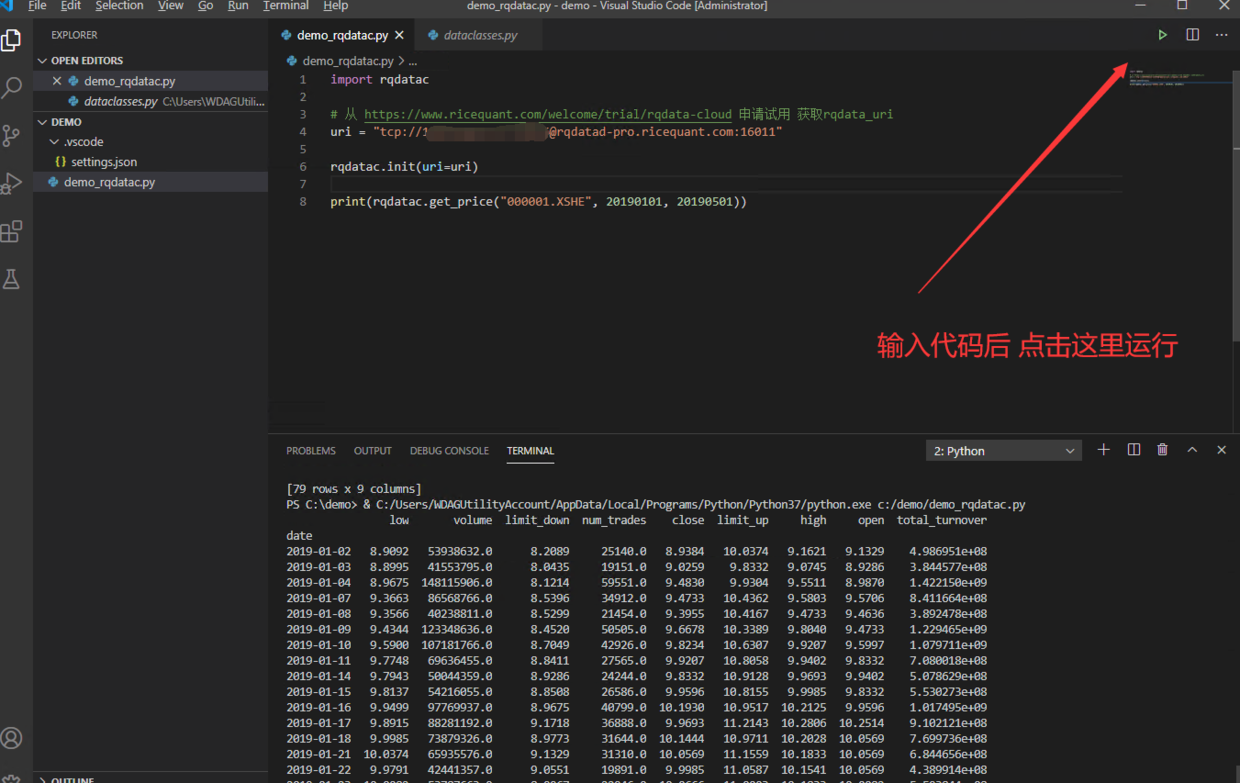
下载使用 rqdatac

  • 创建 python 3.8 虚拟环境 conda create -n py38 python=3.8.2

  • 激活环境 conda activate py38

  • 安装 rqdatac pip install rqdatac 如果安装了 zsh 请执行命令rehash

  • 安装 ipython (ipython 补全功能非常亲民) pip install ipython

使用 rqdatac

  • 输入ipython 然后按如下操作
import rqdatac    
rqdatac.init("手机号","密码")
rqdatac.user.get_quota()
#{'bytes_used': 742981, #已使用流量
# 'bytes_limit': 52428800.0, # 总流量
# 'remaining_days': 760, # 剩余使用天数
# }
rqdatac.all_instruments()
# order_book_id symbol ... listed_date de_listed_date
#0 M1901P3650 豆粕 1901 沽 3650 ... 2018-04-10 2018-12-07
#1 SR1901C4900 白糖 1901 购 4900 ... 2018-04-17 2018-11-26
#2 SR1907C5400 白糖 1907 购 5400 ... 2018-01-17 2019-05-27
#3 M1907P2900 豆粕 1907 沽 2900 ... 2018-07-17 2019-06-10

rqdatac.instruments("000001.XSHE")
# Instrument(order_book_id='000001.XSHE', industry_code='J66', market_tplus=1, symbol='平安银行', special_type='Normal', exchange='XSHE', status='Active', type='CS', de_listed_date='0000-00-00', listed_date='1991-04-03', sector_code_name='金融', abbrev_symbol='PAYH', sector_code='Financials', round_lot=100, trading_hours='09:31-11:30,13:01-15:00', board_type='MainBoard', industry_name='货币金融服务', citics_industry_code='40', citics_industry_name='银行')

rqdatac.get_price("000001.XSHE")
# num_trades limit_down volume ... high open low
#date ...
#2020-01-10 37440.0 15.11 58554845.0 ... 16.81 16.79 16.52
#2020-01-13 42233.0 15.02 87213336.0 ... 17.03 16.75 16.61
#2020-01-14 60290.0 15.29 130449366.0 ... 17.27 16.99 16.76
#2020-01-15 60129.0 15.08 85943912.0 ... 16.86 16.79 16.4

conda 基本操作

  • 查看版本信息 conda --version
  • 更新 conda conda update conda
  • 创建一个虚拟环境 conda create -n py38 python=3.8.2
  • 激活新的虚拟环境 conda activate py38
  • 列出环境信息 conda env list
  • 退出当前环境 conda deactivate
  • 删除虚拟环境conda remove --name py38 --all
随笔阅读需 3 分钟

相关参考 python 中文写入 CSV 乱码解决

  • 原因:csv 文件开头缺少 BOM_UTF8 字符
  • 解决:在 Response 开头加上 BOM_UTF8 字符
  • 核心代码
titles[0] = codecs.BOM_UTF8.decode("utf8")+codecs.BOM_UTF8.decode()+titles[0]    
  • 相关引入
import codecs    
import csv

from flask_admin._compat import csv_encode
from flask import request, redirect, flash, current_app, Response, stream_with_context
  • 逻辑代码(复制 放到对应的 ModelView 类里就好了)
    def _export_csv(self, return_url):    
"""
Export a CSV of records as a stream.
"""
count, data = self._export_data()

# https://docs.djangoproject.com/en/1.8/howto/outputting-csv/
class Echo(object):
"""
An object that implements just the write method of the file-like
interface.
"""
def write(self, value):
"""
Write the value by returning it, instead of storing
in a buffer.
"""
return value

#
writer = csv.writer(Echo())

def generate():
# Append the column titles at the beginning
titles = [csv_encode(c[1]) for c in self._export_columns]
titles[0] = codecs.BOM_UTF8.decode("utf8")+codecs.BOM_UTF8.decode()+titles[0]
yield writer.writerow(titles)

for row in data:
vals = [csv_encode(self.get_export_value(row, c[0]))
for c in self._export_columns]
yield writer.writerow(vals)

filename = self.get_export_name(export_type='csv')

disposition = 'attachment;filename=%s' % (secure_filename(filename),)

return Response(
stream_with_context(generate()),
headers={'Content-Disposition': disposition},
mimetype='text/csv'
)
Python阅读需 1 分钟

  • 人比较懒 ,看不懂评论告诉我哈

vim view_markdown_index.py

#!/usr/bin/python3    
# encoding: utf-8
# @Time : 2020/3/26 15:37
# @author : zza
# @Email : 740713651@qq.com
# @File : readme_helper.py
import datetime
import os
from shutil import copyfile

import markdown
import markdown.extensions.fenced_code
from flask import flash, redirect, request, send_from_directory
from flask_admin import AdminIndexView, expose
from pygments.formatters.html import HtmlFormatter
from werkzeug.utils import secure_filename

formatter = HtmlFormatter(style="emacs", full=True, cssclass="codehilite")
css_string = formatter.get_style_defs()

class MarkdownIndexView(AdminIndexView):

@expose()
def index(self):
"""获取 readme 文件作为 index 页面帮助文档
copy from https://github.com/solitudenote/gitkeeper/blob/d42f5990b05cf28cee12f20780e7794cd3579ead/app.py
"""
# get file
readme_file = open("README.md", "r", encoding="utf8")
md_template_string = markdown.markdown(readme_file.read(), extensions=["fenced_code", "codehilite"])
md_css_string = "<style>" + css_string + "</style>"
md_template = md_css_string + md_template_string
return self.render(self._template, readme_md=md_template, upload_readme_url="/admin/upload_form")

@expose('/upload_form', methods=['POST'])
def upload_file(self):
# check if the post request has the file part
if 'file' not in request.files:
flash('No file part')
return redirect('/admin/')
file = request.files['file']
if file.filename == '':
flash('No file selected for uploading')
return redirect('/admin/')
if file and file.filename == "README.md":
bak_file = "README.md" + ".{}.bak".format(datetime.datetime.now().isoformat()).replace(":", "-")
copyfile("README.md", bak_file)
filename = secure_filename(file.filename)
file.save(filename)
flash('README.md 上传成功')
return redirect('/admin/')
else:
flash('文件名必须为 README.md')
return redirect('/admin/')

@expose('/export')
def export(self):
return send_from_directory(os.path.abspath("."), "README.md", as_attachment=True) # as_a

admin_index_view = MarkdownIndexView(name="主页", template="index.html")

vim index.html

{% extends 'admin/index.html' %}    

{% block page_body %}
{{ super() }}

<table class="markdown-table table-hover searchable">
<tr>
<td>
<a href="{{ get_url('.export') }}"
title="{{ _gettext('Export') }}">{{ _gettext('Export') + ' ' + export_type|upper }}</a>
</td>

<form id="form" method="post" action={{ upload_readme_url }} enctype="multipart/form-data">
<td>
<label class="input-file">
<a title="{{ _gettext('Import') }}"> {{ _gettext('Import') }} </a>
<input type="file" name="file" id="upload-file" autocomplete="off" hidden required>
</label>
</td>
</form>

</tr>
</table>
<br>
<hr/>
<script>

let __main = function () {
document.getElementById("upload-file").onchange = function () {
document.getElementById("form").submit();
};
}

__main()
</script>

{{ readme_md|safe }}

<style>
.markdown-table {
width: 200px;
float: right;

}

.markdown-table label {
font-weight: normal;
}

[hidden] {
display: none !important;
}

</style>
{% endblock %}

vim app,py

from view_markdown_index import admin_index_view    
from flask import Flask

app = Flask(__name__)
admin_view = Admin(
app,
template_mode='bootstrap3',
index_view=admin_index_view,
base_template=r'layout.html',
category_icon_classes={'Profiles': 'glyphicon glyphicon-wrench'},
)

if __name__ == '__main__':
app.run()

Python阅读需 2 分钟

{% extends 'admin/base.html' %}    

{% block head_tail %}
{{ super() }}
<link href="{{ url_for('static', filename='layout.css') }}" rel="stylesheet">
<style>
.container {
width: 100%;
}
</style>
{% endblock %}
Python阅读需 1 分钟

# https://blog.miguelgrinberg.com/post/the-flask-mega-tutorial-part-xiii-i18n-and-l10n
# 请在rqlicense-server 目录下操作
# 生成翻译文件模版
pybabel extract -F babel.cfg -k _l -o messages.pot .
# 生成翻译文件 一般只需要 init 一次
pybabel init -i messages.pot -d rqlicense/translations -l en
# 更新翻译文件
pybabel update -i messages.pot -d rqlicense/translations -l en
# 编译
pybabel compile -d rqlicense/translations
  • 附赠 messages.po 谷歌翻译脚本
#!/usr/bin/python3    
# encoding: utf-8
# @Time : 2019/12/13 15:25
# @author : zza
# @Email : 740713651@qq.com
# @File : 翻译messages.po文件.py
import re
from tqdm import tqdm
from googletrans import Translator

proxies = {"http": 'http://localhost:9999',
"https": 'https://localhost:9999'}
translate = Translator(proxies=proxies)


def service(messages_po_path):
with open(messages_po_path, "r", encoding="utf8") as f:
messages_body = f.read()
messages_lines = messages_body.split("\n")
result_lines = []
msgid = ""
msgstr = ""
for line in tqdm(messages_lines):
if line.startswith("msgid"):
msgid = line
elif line.startswith("msgstr"):
msgstr = line
if msgid == 'msgid ""':
pass
elif msgstr == 'msgstr ""':
translate_str = re.findall(r"msgid \"(.*)\"", msgid)[0]
en_str = translate.translate(translate_str).text
msgstr = msgstr.replace('""', '"{}"'.format(en_str))
result_lines.append(msgid)
result_lines.append(msgstr)
else:
result_lines.append(line)
result_body = "\n".join(result_lines)
messages_po_to_path = messages_po_path.replace(".po", "bak.po")
with open(messages_po_to_path, "w", encoding="utf8") as f:
f.write(result_body)


if __name__ == '__main__':
messages_po_path = r"D:\PycharmProjects\rqlicense\rqlicense-server\rqlicense\translations\en\LC_MESSAGES\messages.po"
service(messages_po_path)

Python阅读需 1 分钟

logging 模块多进程解决方案 concurrent-log-handler 0.9.12

错误日志

PermissionError: [WinError 32] 另一个程序正在使用此文件,进程无法访问。: 'E:\\logs\\contest\\contest.log' -> 'E:\\logs\\contest\\contest.log.1'    

解决

  • bash
pip install concurrent-log-handler    
pip install pypiwin32
  • python
from logging import getLogger, DEBUG    
from concurrent_log_handler import ConcurrentRotatingFileHandler
import os

logger = getLogger()
# Use an absolute path to prevent file rotation trouble.
logfile = os.path.abspath("mylogfile.log")
# Rotate log after reaching 512K, keep 5 old copies.
rotateHandler = ConcurrentRotatingFileHandler(logfile, "a", 512*1024, 5)
logger.addHandler(rotateHandler)
logger.setLevel(DEBUG)

logger.info("Here is a very exciting log message, just for you")

  • 如果有很多日志 建议多弄几个 logger

其他参考

Python阅读需 1 分钟

参考自 利用 frp 透穿访问内网的树莓派

安装

服务器设置

[common]    
bind_addr = 服务器 ip
bind_port = 7000
  • nohup ./frps -c ./frps.ini 跑起程序

设置客户端

  1. 下载 最新版 frp 程序
  2. 解压 frp 并设置 frpc.ini,大概设置成这样:
[common]    
server_addr = 服务器 ip
server_port = 7000

[ssh]
type = tcp
local_ip = 127.0.0.1
local_port = 22
remote_port = 6000
  1. nohup ./frpc -c ./frpc.ini 跑起程序

验证

ssh -oPort=7000 pi@服务端 ip,正常的话将以 ssh 的方式进入树莓派


开机自启

服务端

vim /etc/rc.local

nohup /home/zza/frp_0.23.1_linux_amd64/frps -c /home/zza/frp_0.23.1_linux_amd64/frps.ini &    

客户端

vim /etc/rc.local

nohup /home/zza/frp_0.23.1_linux_arm/frpc -c  /home/zza/frp_0.23.1_linux_arm/frpc.ini &    

使用 Systemd 实现自动启动 frp

Systemd, 可以保证在树莓派意外重启时,能自动启动 frp 相关服务。这样,我们就不用整天提心吊胆,担心各种意外了。

服务端管理 frps

  • 需要先 cd 到 frp 解压目录。

cp frps /usr/local/bin/frps mkdir /etc/frp cp frps.ini /etc/frp/frps.ini

  • 编写 frp service 文件,以 centos7 为例,适用于 debian

vim /usr/lib/systemd/system/frps.service

[Unit]    
Description=frps
After=network.target

[Service]
TimeoutStartSec=30
ExecStart=/usr/local/bin/frps -c /etc/frp/frps.ini
ExecStop=/bin/kill $MAINPID

[Install]
WantedBy=multi-user.target
  • 启动 frp 并设置开机启动

systemctl enable frps systemctl start frps systemctl status frps

  • 部分服务器上,可能需要加 .service 后缀来操作,即:

systemctl enable frps.service systemctl start frps.service systemctl status frps.service

树莓派管理 frpc

  • 需要先 cd frp 解压目录。复制文件

cp frpc /usr/local/bin/frpc mkdir /etc/frp cp frpc.ini /etc/frp/frpc.ini

  • 编写 frp service 文件,以 centos7 为例,适用于 debian

vim /usr/lib/systemd/system/frpc.service

[Unit]    
Description=frpc
After=network.target

[Service]
TimeoutStartSec=30
ExecStart=/usr/local/bin/frpc -c /etc/frp/frpc.ini
ExecStop=/bin/kill $MAINPID

[Install]
WantedBy=multi-user.target
  • 启动 frp 并设置开机启动

systemctl enable frpc systemctl start frpc systemctl status frpc

  • 部分服务器上,可以需要加 .service 后缀来操作,即:

systemctl enable frpc.service systemctl start frpc.service systemctl status frpc.service

  • 注意:
    • frps 或 frpc 启动无效时,可以尝试先停止服务,如:

systemctl stop frpc

编程阅读需 2 分钟

https://gist.github.com/laispace/666dd7b27e9116faece6

git 设置全局代理

git config --global https.proxy http://127.0.0.1:1080
git config --global https.proxy https://127.0.0.1:1080
git config --global http.https://github.com.proxy socks5://127.0.0.1:9999
git config --global http.https://github.com.proxy socks5://192.168.31.2:9999

git 删除全局代理

git config --global --unset http.proxy
git config --global --unset https.proxy

git 设置只对 github 的代理

git config --global http.https://github.com.proxy socks5://127.0.0.1:9999

git 删除只对 github 的代理

git config --global --unset http.https://github.com.proxy

在用户目录下 ~\.gitconfig 下查看配置


pip 设置豆瓣源

顺便贴一下

pip config set global.index-url https://pypi.douban.com/simple
随笔阅读需 1 分钟